The glass pane in your oven door allows you to see how your food is coming along without letting any heat escape from the oven itself. Unfortunately, glass is prone to cracking, and there may come a time when you need to replace your oven door glass because the pane that came with the appliance has cracked or even shattered entirely.

We have a huge collectgion of oven door spares here at Cooker Spare Parts, including an extensive oven door glass range. To place your order, simply go to our homepage, enter your cooker's make and model number, and select the door glass from our list of compatible parts. NOTE: Oven doors have two panes of glass - inner and outer - so you may need to identify which pane is cracked in order to order the right replacement.

Alternatively, if you already know what type of glass you need, click here to browse our full range of oven door spares and simply select the required product on that page.

How to Replace Your Oven Door Glass


Oven Door Glass

Once you've ordered your new oven door glass from the Cooker Spare Parts website and the replacement pane has arrived in the post, it's relatively easy to complete the job without any professional help. Here's our step-by-step guide to replacing your oven door glass:
  1. First of all, you need to take off your oven door in order to work on it without obstruction. In most cases, you'll find a pair of latches at the bottom of the door (inside the oven); unlatch these, then push the door closed as far as it will go without being forced. Once it stops, simply lift the door up and away from the appliance.

  2. The next thing to do is unscrew and remove the door's inner shell (i.e. the panel that holds the glass panes in place). Place the door face-down on a suitable work surface and use a screwdriver to loosen and remove the screws around the top and sides of the door. NOTE: Pay attention to which screws go where, and keep them separate once removed so that you don't mix them up. Once everything is unscrewed, lift away the shell so that you can access the oven door glass itself.

  3. Remove the broken pane, ensuring that any stray bits of broken glass are removed with it.

  4. Make sure the new glass is clean, then carefully set it in place.
All that's left to do now is screw the inner panel back on (make sure each screw goes back in the right place) and reattach the door to the oven itself. Not too hard, eh?

If you're having trouble with your oven door glass or you're unsure which part to order, please feel free to contact the Cooker Spare Parts team today. We're always happy to help!

Bottom Oven Not Working

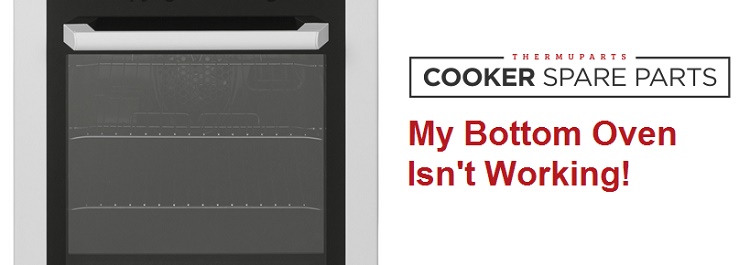
It's great having a cooker with two ovens: not only does it give you more space for big dinners, it also allows you to cook at two different temperatures simultaneously. If your top oven has a grill function, you can even grill one thing while oven baking another!

Of course, the downside of having another oven is having another thing that can break down. Sometimes the entire appliance will malfunction, putting both of your ovens out of action, but it's more common for just one of them to fail - not so totally disastrous, but still very frustrating when it happens.

Today, we'd like to focus on the bottom oven; if yours has stopped working, you may find the solution you seek below.

From here on out, we'll specifically be referring to ELECTRIC ovens. If your GAS oven has broken down, please see our previous troubleshooting post - My Gas Oven Won't Light.

Common Causes

There isn't just one reason your bottom oven might stop working, but luckily this checklist will let you check for the most common faults.

  • Power supply
  • Electric oven element or thermostat

Please note: we always recommend you use a qualified electrical engineer to diagnose and perform the repair to your appliance.

What You'll Need

Once you've found the defective cooker part, you'll need the following to find the correct replacement for your appliance.

  • Model and serial number - this information will be found on a data badge on the appliance.
  • Owner's manual (optional).

For further assistance, feel free to call our team on 02920 452 510, email us on enquiries@cookerspareparts.com, or use the search bar above with your model and serial number.

What to Do

Unfortunately there isn't a simple one answer fix to why your bottom oven may have stopped working. However, there are a few quick checks you can do to ensure a smooth repair.

Plugged In

Make sure it's plugged in. First of all, ensure that the appliance is plugged in properly and switched on at the wall.

Power Supply

Find out if any electricity is actually reaching the appliance. If the cooker isn't doing anything at all - if the clock is off, the lights aren't coming on, and neither the hobs nor the ovens are warming up.

The most likely problem is that no power is actually reaching the appliance.

Assuming that everything is plugged in and switched on, this is probably due to a faulty power supply - it might be that the plug itself is damaged, or that the cable is defective.

Alternatively, you may find that there's a loose connection at the rear of your cooker.

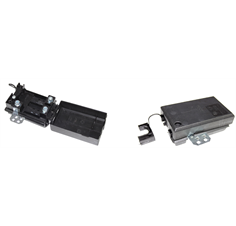
Need help finding the correct power supply for your appliance? Contact our team on 02920 452 510, email us on enquiries@cookerspareparts.com, or use the search bar above with your model and serial number.

Buy Electrical Fittings

Electric Oven Element or Thermostat

Replace the broken part. If you've performed the three checks listed above and found everything to be A-OK, it's probable that one or more of the parts in your bottom oven need to be replaced. 

The most likely culprit is the oven element - that is, the part of the oven that actually heats up - but simply replacing this may not be enough to ensure that the problem doesn't happen again.

You need to ask why the oven element failed in the first place; for example, it could be that your thermostat broke, and your oven element overheated and failed as a result of this.

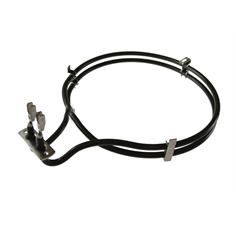
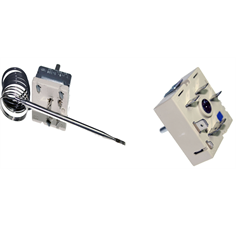
Looking for some extra help finding the correct part? Call our team on 02920 452 510, email us on enquiries@cookerspareparts.com, or use the search bar above with your model and serial number.

Buy Oven Element Buy Electric Thermostat

Good luck with your attempts to bring your bottom oven back to life, and remember: for safety reasons, you should not attempt any electrical repairs unless you are a qualified electrician!

Do you need help finding the correct replacement part for your appliance?

Give our spares team a call on 02920 452 510 or email us on enquiries@cookerspareparts.com with your appliance's model and serial number information.

Gas cooker ignition spark
 

Repairing a gas oven that won't light can be quite a bit trickier than fixing the same issue in an electric oven. Indeed, some tasks should only be completed by a Gas Safe (formerly CORGI registered) engineer - working on a gas appliance when you're not qualified to do so can be dangerous, and in many cases, you may actually be breaking the law by doing so.

 
Still, if your gas oven won't light, there are a few things you can try before calling in a professional gas engineer to fix the problem for you...
 

How can I fix my gas oven?

  • Check the power supply. If your gas oven won't light, remember that gas ovens still need electricity to work, so the first thing to do is make sure that your cooker is plugged in and that there's nothing that could be interrupting the power supply. Is the power cable in good condition? Is it soundly connected to the appliance itself? Is the power switched on at the wall? These may seem like stupid questions, but you'd be surprised by how often a broken cooker turns out to be merely an unplugged cooker!

  • Check the gas supply. If the electricity supply is present and correct, it may be that there's no gas coming to your oven which is causing your gas oven to not light. If your cooker has gas hobs as well as a gas oven, there's an easy way to check this: simply fire up one of your hobs. If the hobs are working fine, it means there's something wrong inside the oven itself; if the hobs won't ignite either, it's probably an issue with the gas supply. Check your gas isolation valve to make sure the supply is actually on, then check that there are kinks or obstructions in the gas line itself.

  • Buy a new ignition generator. If your gas oven still won't light after you've verified that there's nothing wrong with the electricity and gas supplies, the most likely explanation is that you need a new spark generator.  Click the button below to browse our Ignition Generators & Switches department:                                                Check Out Our Range Of Ignition Generators & Switches
Good luck with your oven-fixing efforts, and remember not to attempt any repairs yourself if you're unsure of what you're doing. When in doubt, always call a professional - it's safer and far less likely to result in further oven malfunctions!
 
Zanussi Replacement Elements

If your Zanussi cooker is no longer heating up, it may be because you need to replace the oven element. Fortunately, this task is nowhere near as difficult as you might expect, and even if you've never attempted to repair a cooker before, you're probably more than capable of getting it done. Read on for expert advice from the Cooker Spare Parts team - your trusty Zanussi appliance will be up and running again before you know it!

How to Order a Zanussi Oven Element:


It's very easy to find and purchase the right element for your Zanussi oven here at Cooker Spare parts, but first, you'll need to find out your cooker's model number (e.g. ZOB551X). This information can be found on the data badge, which is usually located behind the oven door on Zanussi appliances.

Once you've written down the model number, head over to the Cooker Spare Parts homepage, enter your manufacturer and model number, and click 'Search Parts'. We will then show you a full list of the parts that are compatible with your cooker.

Alternatively, if you already know exactly which element you need, you can head straight to our Zanussi oven elements page and simply select the one you wish to purchase. Either way, our secure and straightforward online checkout system will allow you to place your order in just a few clicks.

How to Install Your New Zanussi Oven Element:


Once your new element has arrived, replacing your broken element is a fairly simple task. The exact method may vary depending on which Zanussi cooker you own, but here's a rough guide on how to replace your Zanussi oven element:

  • Ensure that your cooker is switched off at the wall.

  • Open the oven door, remove the shelves, and take off the panel at the back of the oven to access the space where the element is housed. You may need to unscrew the panel with a screwdriver before you can remove it.

  • The broken element should be held in with screws, so pick up your screwdriver again and take these out so that you can remove it.

  • You will also need to gently pull the wires out of the broken element - be sure to take a photo beforehand in case you forget which wire goes where!

  • Take your new element and connect the wires that you just removed from the old one (refer to the photograph you took if you can't remember where each one goes).

  • Screw the element back into place, then screw the back panel on and put your oven shelves back in.

  • Dispose of the broken element (preferably by recycling it).
Click here to see our full range of spare parts for Zanussi cookers, or give us a call on 02920 452 510 if you have any further questions.
 Fan Oven is Not Heating Up

In most cases, if your fan oven is not heating up the problem will turn out to be that your fan oven element is faulty. However, instead of replacing the entire cooker, you can easily replace the oven element and save yourself a bit of money - which is always a good thing!

Unless you're a big fan of salad and breakfast cereal, you probably rely quite heavily on your cooker when preparing meals at home. So, if you start to notice that your fan oven is struggling to heat up (or not heating up at all), it's important to get this issue sorted.


How to tell if your oven element has failed

It can often be hard to tell whether or not there is a problem with your oven element. Your fan oven may appear to be working normally - that is, the fan may be functioning and the light inside the oven may be on - and yet, when you remove your food from the oven, you notice that your food hasn't cooked properly. Perhaps it's because the oven didn't quite reach the temperature you asked for, or perhaps it simply failed to heat up whatsoever.

Sometimes, you'll be able to know that there is a fault with your element just by looking at it. Any burns or bulging of the element will be enough to confirm that you need to fit a new element. However, sometimes you'll need to replace it even if these visible symptoms are absent.

Time to get a replacement!

Once you've figured out that it's the fan oven element causing you issues, you'll need to order a replacement element in order to rectify the problem. We at Cooker Spare Parts have an abundance of top-quality replacements that will return your cooker back to its glory days in no time.

To find the replacement part that is suitable for you, return to our homepage and enter both the manufacturer and the model number of your cooker into the search filters near the top of the page. Once you've entered your model details, a list of parts will appear that are compatible with your cooker. To refine your search, click on the part type drop-down menu and select oven elements; you will then be shown a list of oven elements that are compatible with your cooker. Once you've located the element right for you, all that will be left for you to do is purchase your part and fit it to your cooker.

To view our full range of oven elements, click here.

If you have any problems or questions regarding your fan oven not heating up or any other issues, feel free to contact us today - our team of cooker part experts will be more than happy to solve any issue you have.