Oven Maintenance Tips

As the old saying goes, “prevention is better than cure”, which so happens to apply perfectly when it comes to your cooker. By taking the necessary steps needed to avoid potential problems with your oven, you can save yourself a bunch of hassle, time and money trying to fix it up. So, what are the things that you need to be doing to ensure your cooker continues to run as efficiently as possible and avoids any unwelcome issues? Below we take a look at 10 essential oven maintenance tips.

  1. Check your oven door seal – Did you know that over 20% of an oven’s heat can escape if the doors are not sealed properly? This can and will result in incredible losses in efficiency, meaning your food is going to take a lot longer to cook – nightmare! To ensure your oven door seal is intact, simply open the door and feel the rubber gasket around the perimeter of the oven’s hatch to check for any broken, torn or worn sections. If you happen to find more than one broken area, then it is time to get your seal replaced! You can browse our range of replacement door seals & gaskets below.


  1. Clean your broiler pan – One thing is for sure; broiler pans can be a real pain to clean. Nobody wants to spend hours scrubbing off old, burned food do they? An easy solution to clean your broiler pan is to heat the pan up and then sprinkle some detergent on the affected areas. Cover the laundry detergent with wet paper towels and after around 15 minutes, remove the towels and scrub the food off easily.


  1. Salt a grease spill – Spillovers can be an annoying part of cooking, especially if you're making an effort to keep grease off of your cooking tray or dish. To make light work of cleaning up spills, simply sprinkle table salt over a spill before using your oven. Now, close the door and proceed to cook your food. When it’s finished, you might be surprised to see a tricky grease spill has turned into a cleanable pile of ash that can be easily swiped away.


  1. Oil your oven rack – If you want your oven racks to glide smoothly when taking them out and putting them back into your oven, then it’s important to not ignore them. Start by cleaning the oven wall ridges that the racks slide in and out on using soap-filled steel wool pads. Once the ridges have dried, wipe them over with some vegetable oil. Your oven racks should now glide on the ridges effortlessly.


  1. Cleaning dirty oven racks – An old but effective method of cleaning your dirty oven racks. Simply get a large, heavy-duty plastic bag and fill it with vinegar, dishwashing liquid and hot water. Then, place your oven racks inside, seal the bag and place it in a tub of warm water for an hour or so. Once this has been done, remove the racks from the plastic bag, scrub, rinse and dry. Your racks should now be just fine to use again. If you can’t get hold of a heavy-duty plastic bad, then you can use your bathtub instead. Simply fill the bath with soapy water to loosen the grime on your racks. The longer you leave them to soak, the easier it will be to get the grime off.


  1. Cleaning the inside of your oven – If your oven racks and clean(ish), but the rest of the inside of your oven isn’t, then you’ll be glad to know that there is an easy solution. Simply fill a microwave-safe bowl with water and turn your oven on a high temperature for two minutes. Now, turn your oven off and leave it for a further two minutes. You can now open your oven door and using a sift rag, begin to wipe the muck on your oven walls off.


  1. Removing embedded food – Removing food from your oven that has been caught in between the racks can be a real pain, but it really doesn’t have to be. To get the food out, all you need is an ordinary plastic nail file and a damp cloth or newspaper bail. Attache the cloth or newspaper to the nail file and place in between your oven racks. The trapped food should attach and be easily lifted out.


  1. Regular stain removal – You may be surprised to learn that newspapers actually work a lot better to clean your oven than a sponge. Try making a ball from a few sheets of newspaper, soak it in soapy water and rub your oven down with it. The burnt food and stains should easily wipe with minimal fuss and effort. A good tip to remember when cleaning the inside of your oven is to not wait for your oven to cool down. The longer you leave cleaning your oven once it has been turned off, the harder it will be to remove dirt and stains. Burnt food is a lot easier to remove while the walls are still warm.


By following these essential cooker and oven maintenance tips, you will go a long way to ensure that not only does your cooker continue to work at its optimum level, but the chances of damage and fault are dramatically reduced. If things are already looking bleak for your cooker and you require quality replacement parts to get it back and running, then Cooker Spare Parts are here to help!

We offer an extensive range of replacement parts for a wide variety of cooker models, so no matter what you need, we are confident that you’ll find it here. Click below to browse our spare parts. For more information on any of our parts or on our oven maintenance tips, then please do not hesitate to get in touch with a member of our team today.

Browse Our Replacement Cooker Parts >

Infographic Transcript

If you’re faced with an oven that’s well and truly on the fritz, there’s no need to panic! While this culinary catastrophe is undeniably inconvenient, there are a few common reasons your oven might be failing, all of which can be resolved with a little help from Cooker Spare Parts!

A Quick Safety Reminder: Whether you have a gas or electric oven, it’s important that you don’t start tampering until you’ve disconnected the power/gas supply! If in doubt, seek the help of a professional engineer.


1.    Test the Severity of the Problem

Identifying the cause of your mealtime misfortune starts with a quick assessment. If you’re not sure how well your oven is (or isn’t) heating up, follow these simple steps:

1. Place a temperature gauge inside the oven and set the temperature to a high heat (250/300°c). 

2. Give your oven a while to heat up (5 or 10 minutes).

3. Check the temperature gauge – has your oven reached the desired temperature? 


2.    Identify the Cause of the Problem

My Oven is Stone Cold…

It’s fair to say that something has gone severely wrong inside your oven if the temperature gauge is still showing 0°c! Here are a few common causes of a conked-out cooker:

It could be…

  • The Heating Element

The heating element is the fundamental heat source in your oven, if that goes, you might as well throw the towel in… (or head to Cooker Spare Parts to order a new one!)

Most ovens have two elements, one in the base of the oven for baking and one in the top of the oven for grilling. It’s important that you identify which is broken.

  • The Gas Ignitor

For gas ovens to heat up, a critical spark is required. Safe to say, if your ignitor is inoperative then your oven won’t be getting warm anytime soon.

  • The Selector Switch

The selector switch is the knob on the outside of your oven that you use to set the temperature.

These parts are prone to breaking and sticking over time, so it’s possible that your oven is fine (it just doesn’t know what you want it to do!)


My Oven Gets Warm, But Not Hot…

If your oven assessment showed that your oven is getting a little toasty but not quite reaching its peak, there are a few things that could be faulty.

It could be…

  • The Temperature Sensor

Many electric ovens have a temperature sensor so they can regulate their internal heat. You guessed it, if the temperature sensor stops working then the oven won’t know when it’s acclimatised!


3.    Solving the Problem

Head to Cooker Spare Parts to order your replacement parts!

Oven cooking is, more often than not, a vital part of the evening meal-time routine. In fact, you only really realise just how vital it is when it’s out of action and no longer usable.

That being said, there’s a lot more to oven cooking than simply heating up a pizza or thawing frozen chips.

There are a number of oven accessories in particular that can really allow you to use it to its fullest potential.

To help you get the most out of your oven, we’ve listed a handful of must-have oven accessories that’ll have you loving your oven in no time.


must have oven accessories


Roasting Pans

While it may conjure up images of Sunday chickens and Christmas turkeys gently browning to a mouth-watering gold, the humble roasting pan is far more versatile than you might think.

Due to the superior air circulation, roasting pans are perfect for vegetables too, creating a fantastic even bake for perfectly cooked veg.

The size and depth also make them perfect for creating a jumbo-sized lasagne for social occasions with multiple mouths to feed.

That being said, the roast is tailor-made for meats and poultry, big or small.

Those that come with a roasting rack also have the added benefit of elevating your meat off the base allowing the fat and juice to drip off. Gravy!


Cake Trays

An oven essential, particularly when The Great British Bake-Off is on, the humble cake tray is a must for any kitchen-dweller that wants to make the most of their oven beyond the main course.

Cake trays and tins come in a variety of shapes and sizes, as well as materials; e.g. sandwich pans are perfect for creating layered sponge cakes, like Victoria Sponge.

Meanwhile, springform pans are ideal for softer cake textures, like cheesecakes and tortes, while they can also make for the ideal base for deep-dish pizzas, quiche and savoury pies.


Oven Dishes

Typically made of glass, porcelain or steel, oven dishes are the Swiss Army Knife or the baking world.

Handy in a variety of cooking scenarios, these versatile vessels are capable of creating a variety of dishes, from casseroles to pasta bakes.

Another handy perk is that they can be transferred straight from the oven to the table for serving (just make sure you place it on a heat-proof surface).


Spare Grill Shelf

When it comes to cooking multiple things at once, a spare oven shelves can be a real life-saver. More accurately, it can be a real meal-saver.

Overcrowding shelves in the hopes squeezing in multiple items to cook simultaneously isn’t smart.

Not only will it result in poor heat circulation for an uneven bake, in the case of cakes and cookies, it can also result in the resulting items merging and sticking together.

A spare shelf can be just the solution, allowing you to spread your cooking over two shelves. Just be sure to rotate to ensure all items are cooked evenly.


Oven Thermometer

A must when it comes to cooking your dish to the desired amount, an oven thermometer can be the difference between burnt offerings and bon appetit.

While some ovens come with these built-in, most will not, typically leaving you to rely on the electric thermostat and the accompanying light to gauge the heat level.

Moreover, the built-in oven thermostat can lose its accuracy over time without warning, leaving you hungrily staring at an undercooked meal or cremated carcass.

Hang the thermometer in the centre of the oven on the middle rack for the most accurate reading.

For an even more accurate idea of cooking temp, you may want to invest in a meat/cake thermometer for the perfect result.


For more details on oven must-haves and replacement parts, why not drop us a line today? Call now on 02920 452 510 or get in touch via email using the button below.

Contact Us

Ah, oven cleaning. The culinary equivalent of tooth extraction: terrifying and painful but ultimately a necessary evil.

It’s a chore that nobody looks forward to but, as responsible adults, we are naturally faced with every once in a while, particularly those that own their own home.

As such, any oven cleaning tips to make the task easier are always welcome, in our book.

Well, would-be oven cleaners, you’re in luck. We’ve got three handy hacks that will leave your oven looking good, smelling good and performing on all levels.


oven cleaning hacks, oven cleaning tips


Attack the Rack

When it comes to restoring your oven rack back to its former glory, this next trick may seem like a bit of a half-baked idea, but trust us – it works!

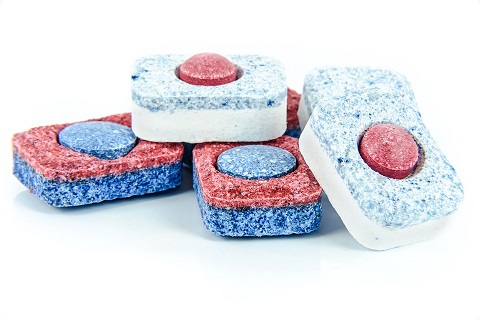
The best way to attack your rack is with a nice, relaxing soak in the bath. Not for you, but for your dirty oven racks – so don’t pour yourself a glass of red and light those candles just yet.

First, wrap your racks in foil so they are completely covered. Then, run a hot bath deep enough to cover the racks and simply leave to soak with a dishwasher tablet for at least two hours.

Once the two hours plus have expired, simply unwrap the racks, give them a wipe down and bask in their greaseless glory!


 lemon oven cleaning hack

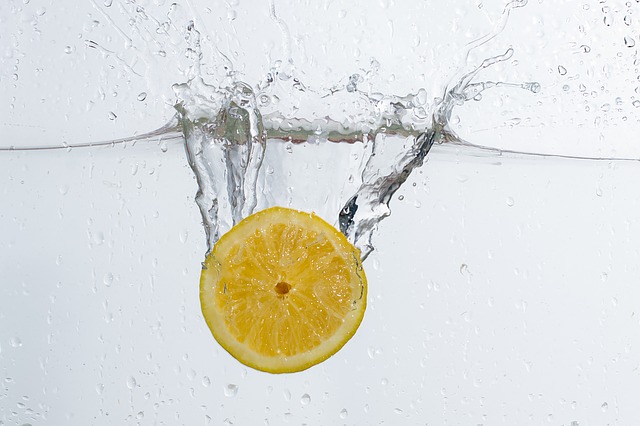
When Life Gives You Lemons

While the sweet scents of roasting chicken and freshly baked cakes can be wonderful aromas to have floating around the kitchen, the same can’t quite be said for oven dwelling fish and baked-on cheese.

Luckily, when it comes to ridding your kitchen of those latter nasty smells, the solution is surprisingly easy, without a chemical cleaner in sight.

The citric power of lemons and oranges are more than enough to combat your oven’s nasal nuisances, while vanilla extract also makes for a fantastic natural odour-eater.

Best of all, each method is incredibly simple! Simply pick your weapon of choice and get to it! For the complete step-by-step of each, head over to our blog on getting rid oven smells and see for yourself.


Let Off Some Steam

Now, time for the main event – cleaning the inside of the oven.

When it comes to rolling up your sleeves and getting down to the nitty-gritty, this next hack will make life a lot easier. Best of all, it requires very little effort at all!

Fill an oven-proof dish about 1/3 of the way up with hot water. Next, add an equal amount of white vinegar to the bowl, mix and place in the oven.

Ramp up the heat to 180°, close the door and allow the mixture to come to the boil, cutting off the heat once it does.

Open the door and spray the inside of the oven with a 50/50 solution of warm water and white vinegar. Leave to sit for at least 30 minutes, allowing the oven to cool down at the same time.

Once the oven has cooled down, get to work on the grime by wiping down the inside. The residue should now be loose, allowing you to clean with ease.


toothbrush oven cleaning hack

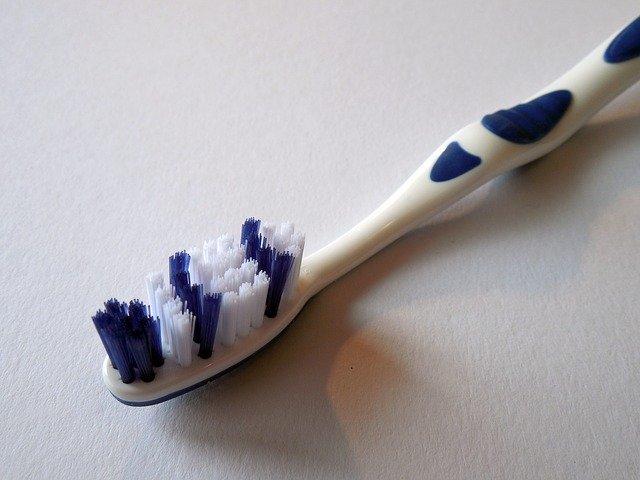
Utilise Your Old Toothbrush

As far as oven cleaning hacks go, this one is sure to shed hours off the snooze-worthy scrubbing!

Grab your old toothbrush, dip it in your chosen oven cleaning solution and get to work on the cracks, crevices and corners.

The small head and soft bristles are great at removing baked-on dirt without tarnishing your oven's interior.

Once you're finished, pop your old toothbrush under the kitchen sink ready for the next oven cleaning occasion, or (if it's really destroyed) chuck it away - you wouldn't want it ending up in the bathroom by accident would you!)


Take Mrs Hinch's Oven Cleaning Advice!

If you don't know who Mrs Hinch is, you need to get to know. She's basically the cleaning goddess, so if anyone can help you get your oven clean - it's her.

Mrs Hinch uses an abrasive cream cleanser called the Pink Stuff to clean her oven, and the results are spectacular!

Simply apply the paste all over your oven and gently massage it into tough stains and grease. Then, using a cleaning cloth or nylon scourer, remove the paste (and all the dirt with it!).

For more top oven cleaning tips, check out our blog on our “How to Clean an Oven” blog for the full rundown. For any other enquiries, call now on 02920 452 510 or click below to get in touch online.

Contact Us

Cleaning an oven is an unenviable task that commonly finds itself high on the list of hated household chores.

Dirty, boring and laborious, it’s a duty that tends to be avoided at all costs, unless absolutely necessary.

That being said, when needs must, productivity often hits a roadblock when it comes to cleaning the oven door.

Keep your oven from becoming a culinary crimes scene with this handy guide to cleaning oven glass.


cleaning oven glass, clean glass oven door, cleaning oven door


Cleaning Oven Door Glass

The ability to clean the glass of your oven door can make or break your oven cleaning endeavour.

Unsightly drips and noticeable streaks are far from an uncommon occurrence on oven glass and can leave your oven appearing grubby, even if the inside itself is actually spotless.

However, oven glass accessibility isn’t always simple and can take a lot more effort than simply spray, scrub and wipe.

If your oven door glass playing hard to get, you may need to be a little creative in your approach. Luckily, there’s a tried and tested formula for just that.


Hang in There

Oven doors are notoriously tricky to clean, particularly when it comes to maintaining the transparent glass front.

Worse still, oven doors often comprise of multiple layers, a myriad of parts and a multitude of intricate fastenings holding it all together.

Avoid the headaches of dismantling and horror of reassembling your oven door by using this handy coat hanger hack.


Hang Fire

Before you do anything else, you’ll need to make your coat hanger contraption.

Straighten out a metal coat hanger and wrap a glass cleaning wipe around it, securing it in place with an elastic band.

Hey, presto – one wiry cleaning wand!


Infiltrate

Most ovens will have a drawer or casing below the oven door itself.

Remove this front panel to reveal the oven door’s exposed inner workings. This will give your additional access to the oven door, including the usually inaccessible oven glass.


Behind Enemy Lines

By laying under the now exposed door base, you’ll now be able to see open slots, giving you access between the oven and the window glass.

Slide the wire cleaning wand into the gap and simply wipe away the dirt from the grubby area.

For dirty glass, this may take a couple of goes with several new wipes – but be persistent. The result will be worth the effort!


Fall Back

Once clean, simply remove the wand and bask in the glory of a job well done!

When you pull out the hanger and see how much dirt has been removed by the glass wipes, you’ll be amazed at how effective this simple technique can be.

And all without removing a single screw!


For more information on oven cleaning, why not check out our other oven cleaning blogs for more hints, tips and hacks. Alternatively, if your oven is beyond cleaning and you’re in need a replacement part, call now on 02920 452 510 or get in touch online using the button below.

Get in Touch